Monday, May 4, 2009

Improve button response: Smush the carbon rings

The title sums it up. I just found that I could get much more sensitive button response (and far fewer undetected presses) if I first 'smushed' the carbon rings on the underside of the keypads against the circular flower-like traces that they sit above. I'm not sure exactly why it works, but it's helped quite dramatically.


I removed the outer-most top plate so I could grip the buttons properly, then simultaneously pressed and twisted each one left and right, rubbing the carbon ring against the pcb.

If you're getting a lot of missed button presses with your arduinome give it a try.

Friday, October 17, 2008

Donate a name

Supercollider
Work on the mlr-ish SuperCollider app is going well. Mute groups are working correctly and now I'm starting to implement pattern recording. With the help of people on the sc-users mailinglist I've been able to get unit tests working, which speeds up the whole bug-catching and fixing cycle.

Supercollider
It would be handy to have a name for this clone already. I like the idea of naming it after an animal but didn't find anything suitable yet. All suggestions are welcome!

As soon as I have a version that does pattern recording, and preset saving/loading, I'll publish the code so if anyone else wants to extend it in their own way, it should be possible.

Wednesday, October 1, 2008

Monome clone running mlr clone


An mlr Clone Running on a Monome Clone from basementhum on Vimeo.

Here's a short clip showing a test of the Arduinome using an early version of the mlr-ish application i'm writing in SuperCollider.

Friday, September 26, 2008

Arduinome lives!

Arduinome

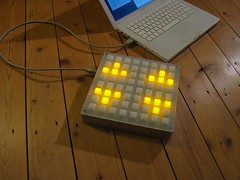
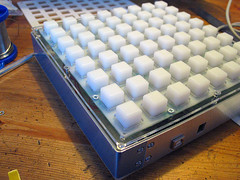
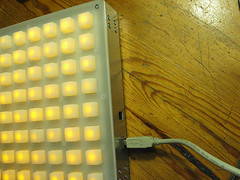
All done! xndr brought by a thicker faceplate earlier today. This means that the buttons dont stick up so far as they did before, and have a clearer, less wobbly action now.

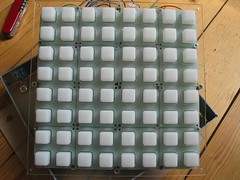
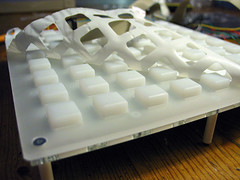
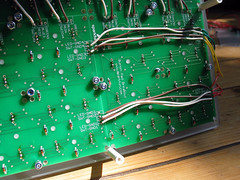
The sticking buttons are fixed too (I think); through a combination of snipping away some excess parts of silicone to stop it bunching up around the screw holes, loosening the nuts that fasten the buttons to the inner faceplate, and careful positioning of the outer faceplate to maximise the gap round each button. If you look at the large version of the following photo, you can see where the silicone has been snipped away:

Arduinome

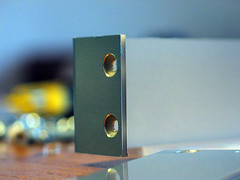
You can find some more photos of the box in different states at my flickr photostream.

There are a few things I wish I'd known about earlier, here are a couple of the things I can remember:

1. Solid core wire is good for breadboarding, but multicore wire would have been better for the 'real thing', since it's more flexible (easier to squash down, and out of the way) and less liable to snap. Wires snapped at solder points about ten times over the course of building this box, I came to dread opening it in case another one would break.

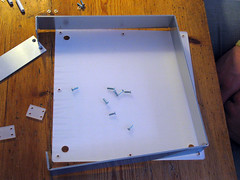
2. If you're thinking of using a Machinecollective enclosure, try to get hold of one before you start soldering, that way you'll be able to cut the wire to appropriate lengths for easier assembly.

3. The project will potentially take many hours to complete. I didn't keep a log of how long i spent on this, but its certainly much longer than I expected.

A huge thanks to Monome, for enabling people to create this kind of clone, and to everyone who's contributed their time and expertise to the Arduinome project.

Next: I'm busy building a mlr-inspired application in SuperCollider, to use with the Arduinome. I'll post a demo, and code samples here when there's something interesting to see.

Friday, September 12, 2008

Button Action

Machinecollective Enclosure: Version 2

The new metal spacers arrived and I put the machinecollectve casing together. The box is looking great and feels sturdy generally. There are two things that i'm still hoping to fix:

1. Some of the buttons are sticking. When they're pressed they sometimes don't pop back up of their own accord.

2. Because the sparkfun buttons extend quite high above the faceplate, they often have some lateral 'wobble' when pressed. I'd like to experiment with using two stacked faceplates to steady this and get a cleaner, 'downwards only' press action.

A sidenote: I'd been putting the enclosure together the hard way all this time! Looking at Xndrs photos i noticed that he builds them from the faceplate down, instead of trying to screw things onto the bottom panel and working upwards. This makes things much easier.

Saturday, August 9, 2008

MachineCollective Enclosure, version 2

Machinecollective Enclosure: Version 2

Machinecollective Enclosure: Version 2

Machinecollective Enclosure: Version 2

Machinecollective Enclosure: Version 2

Xndr brought over new pieces for the enclosure with modified measurements and new screw holes, here are some more pictures of the enclosure in stages of assembly.

But I had some problems with the plastic spacers. Because I needed to take the box apart and put it together several times, the threads inside three of the spacers wore out. Perhaps it'll be necessary to use metal ones instead.

Meanwhile it's great to hear that the more people are busy working on the 'Arduinome' software. As well as a new version of the firmware, a custom app is being developed that will replace MonomeSerial. This app is specifically designed for use with Arduino powered monomes, and we are assured that it will bring important stability and performance improvements. Check the announcement on the Bricktable blog.

Also: a big thanks to Thomas Margolf, again I summoned his huge electronics expertise to solve a problem that turned out to have been caused by my forgetting to connect some wires [foreheadslap].

Friday, July 25, 2008

MachineCollective Enclosure

MachineCollective enclosure (beta)

Xndr from Machine Collective is supplying a very nice enclosure for the project. (80 EUR). This projects also acts as a kind of beta test for his sparkfun monome enclosure parts.

MachineCollective enclosure (beta)

MachineCollective enclosure (beta)

An ingenious, almost seamless aluminium side panel with nicely rounded corners.

MachineCollective enclosure (beta)

MachineCollective enclosure (beta)

MachineCollective enclosure (beta)

MachineCollective enclosure (beta)

MachineCollective enclosure (beta)

Here's the inner base panel. Notice that the shield does not sit on the arduino anymore (to keep the height of the unit to a minimum). Instead the two are connected with wires soldered to header pins. The shield is clamped in place by a few cleverly cut pieces of plastic tightened down with screws.

MachineCollective enclosure (beta)

Also, It turns out that I needn't have removed the 'break off' part of the shield. Now I have the problem of how to secure this loose piece to the base of the enclosure.